As a bit of sensible site management I recently moved a group of stand-alone WP installs into a single WP multisite instance. WP multisite allows you to serve multiple domains from a single WordPress install, which makes system management much easier. It also makes plugin management exponentially more difficult, but that’s for another day.
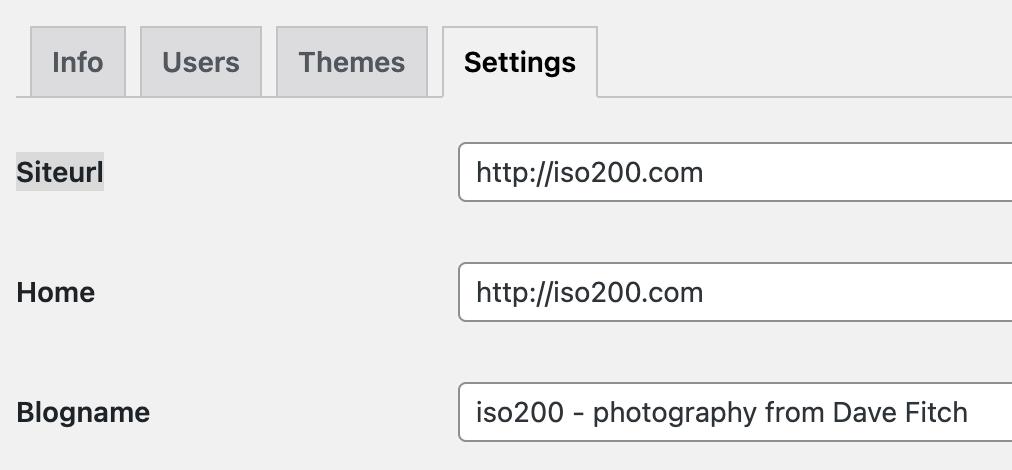
I setup a temporary site to do the install and plugin/theme testing, and then once the content was imported I tried to update the WP multisite settings to take over from the previous domain. I went into the Site’s settings, and updated the values for Siteurl and Home.
And it worked, sort of. WP served the right content… but at the wrong domain.
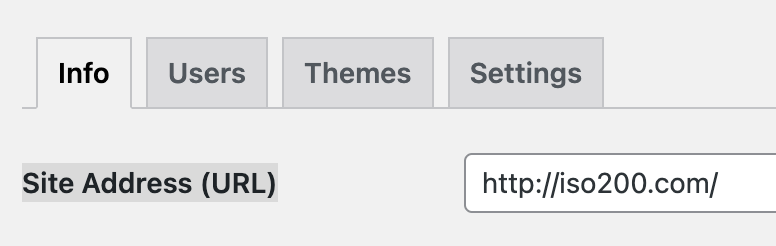
Site Address (URL) =/= Siteurl
Turns out setting new values for the Siteurl and the Home url are only two of the things you need to do.
You also need to update the value for the Site Address (URL). You may have thought that Siteurl and Site Address (URL) are the same things, but you would be wrong.
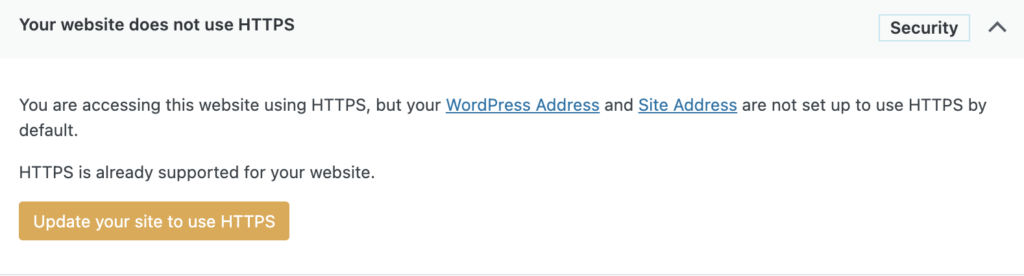
If you look at the Site Health for your WordPress installation, if you have a relatively old site you may have set it up like http://your.domain, vs https://your.domain -i.e. you didn’t prefix your url with https.
WordPress will complain about this:
You have two options: click on the “Update your site to use HTTPS” button, or to follow the links to WordPress Address and Site Address and edit the values there.
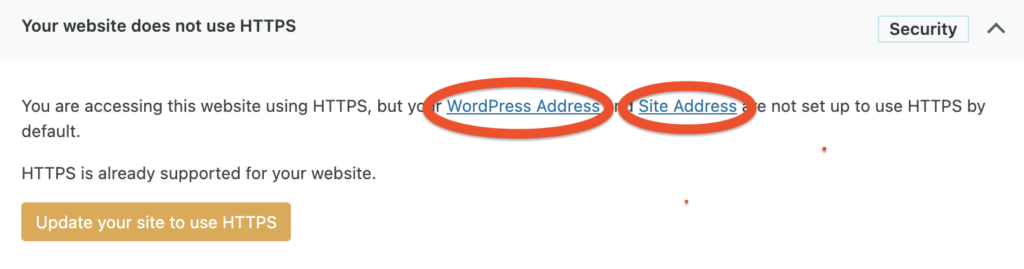
However if you are using a WordPress Network (aka WordPress Multisite), these two links won’t work – they will take you to another Admin page, but you won’t be able to update your Site Settings there, as these values are not available there in a Multisite install.
Solution:
In your menu bar, click on MySites > Network Admin > Sites, and hover over your site name, then click ‘Edit’. Manually change http to https in 3 places: Site Address (URL) (on the Info tab), Siteurl, and Home (both on the Settings tab).
Or just click on ‘Update your site to use HTTPS’. This does work in Multisite.
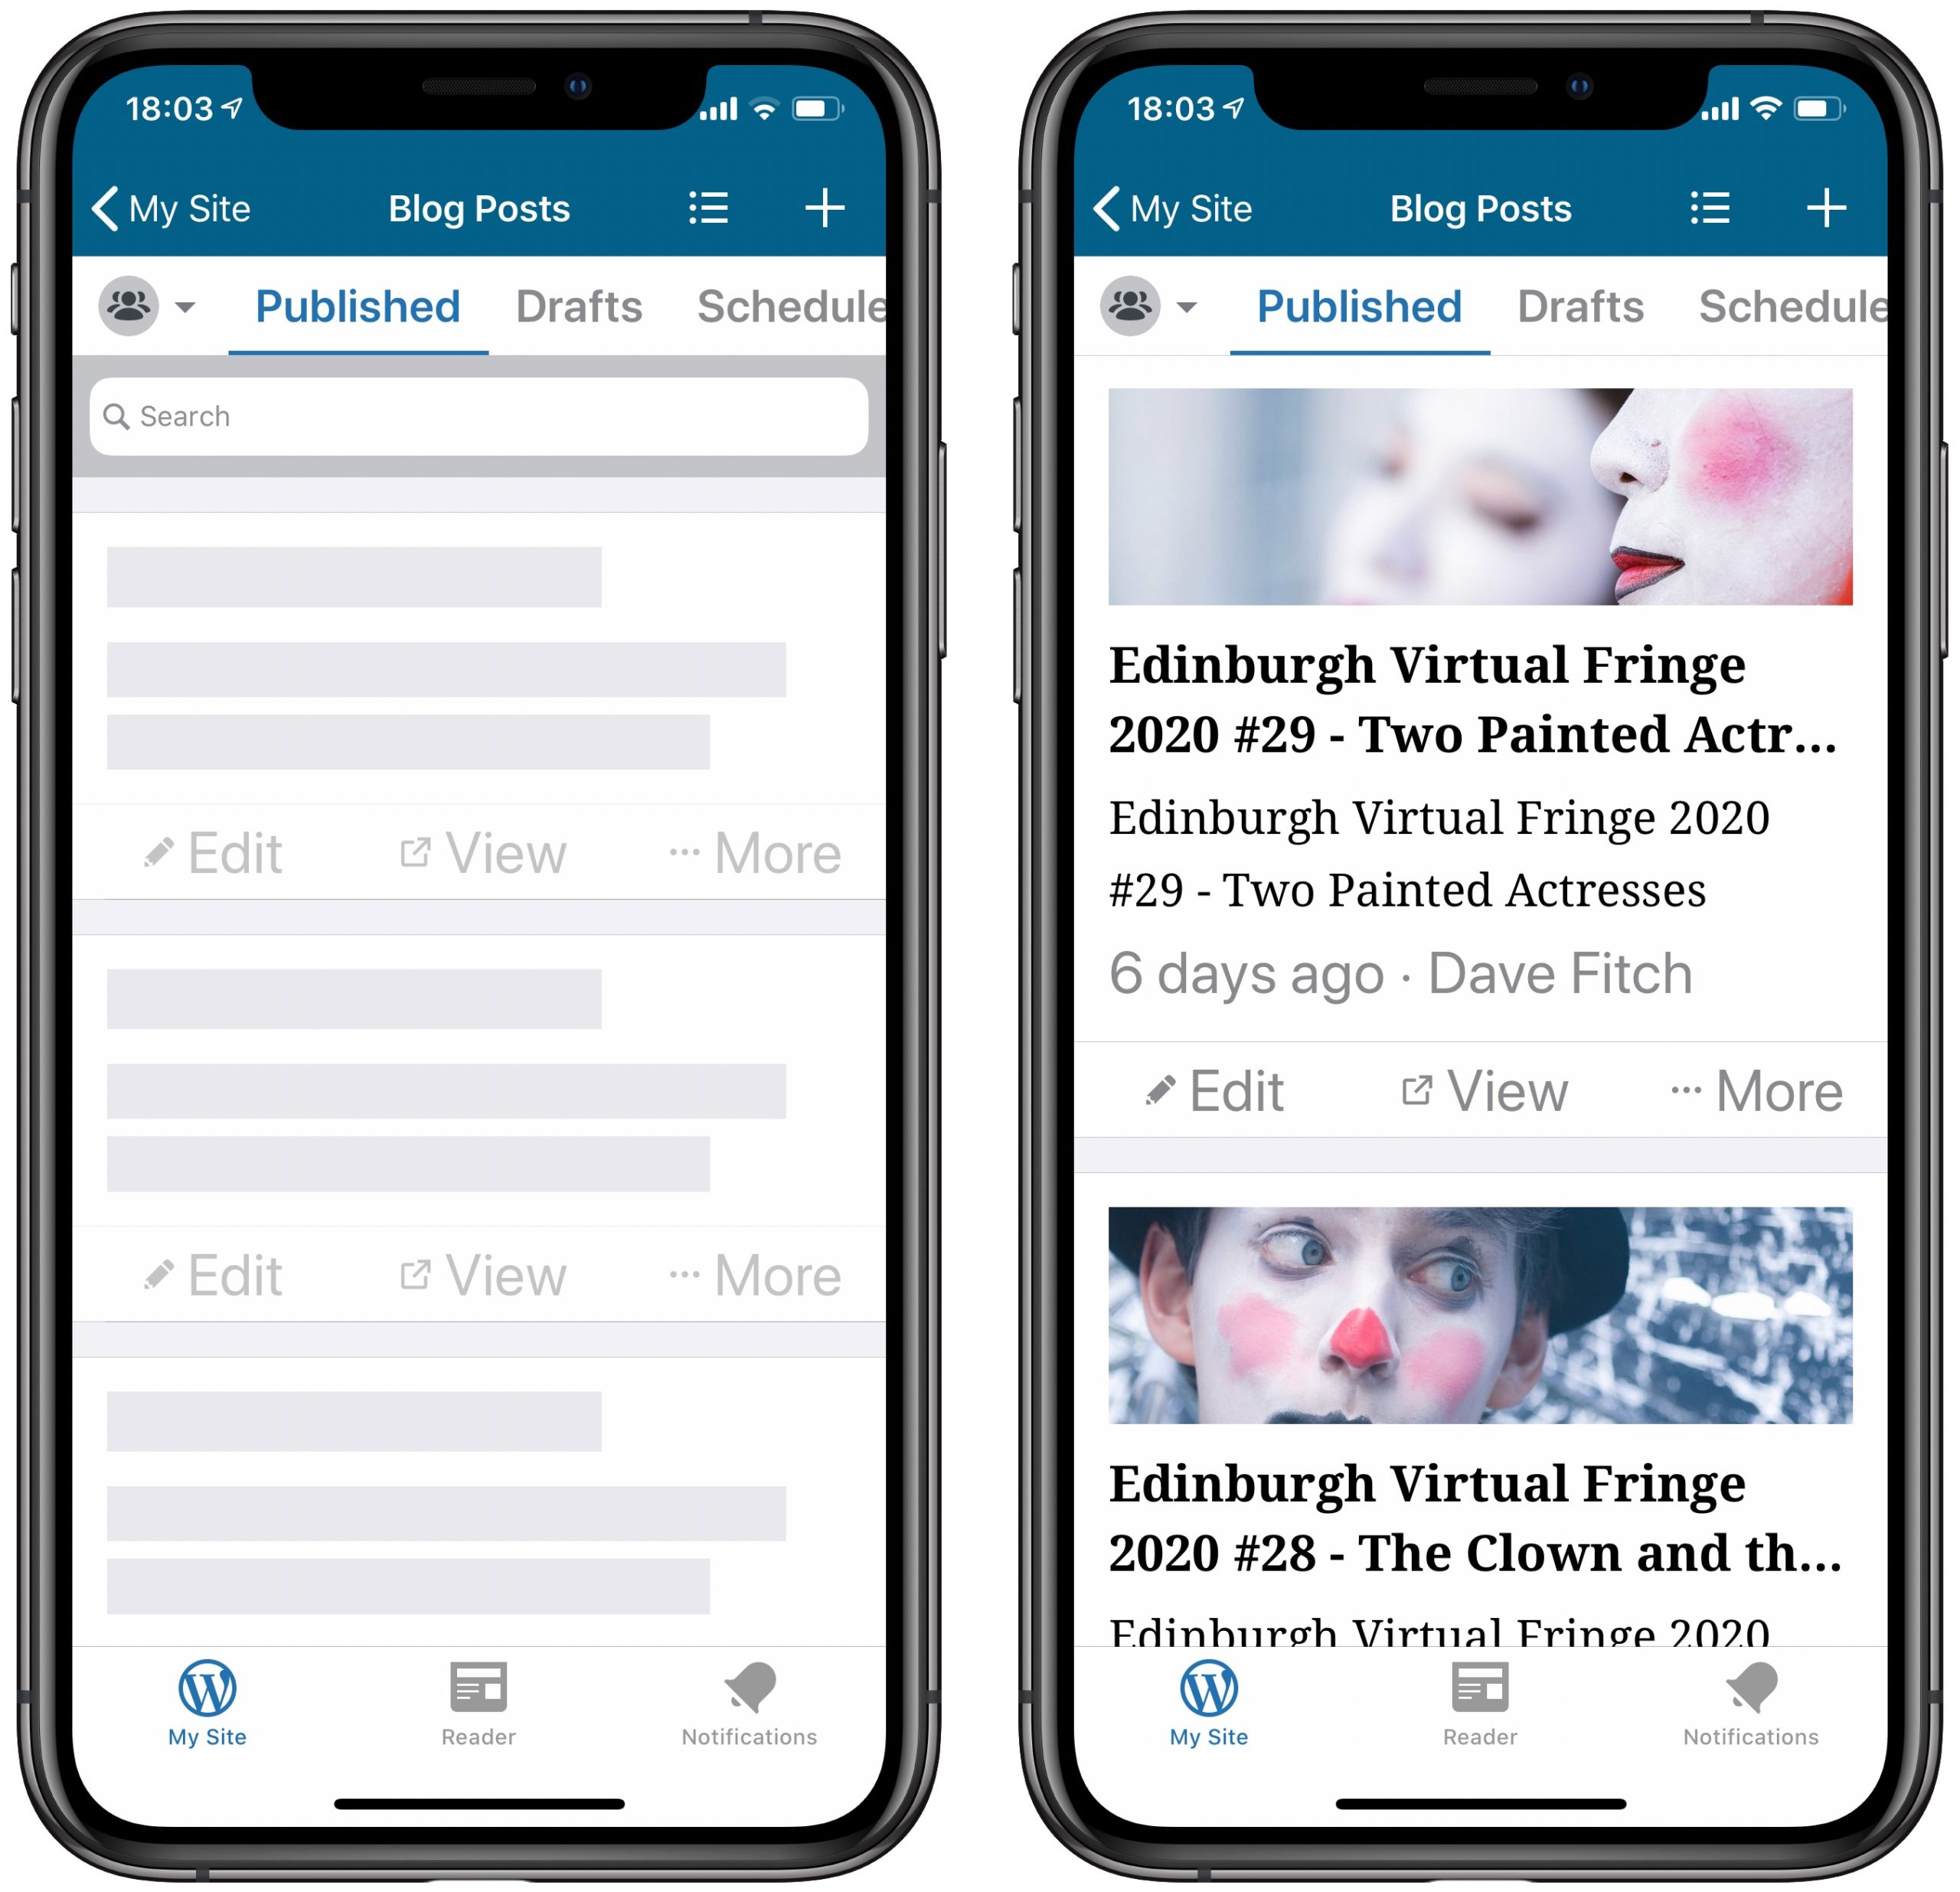
Are you getting blank spaces in the iOS WordPress app (image on the left) when you’re expecting to see a list of posts (as on the right?).
It may be because you are running a very outdated copy of Jetpack – Automattic’s all-singing all-dancing mish-mash of tools and services. Version 7.+ seems to be what you need.
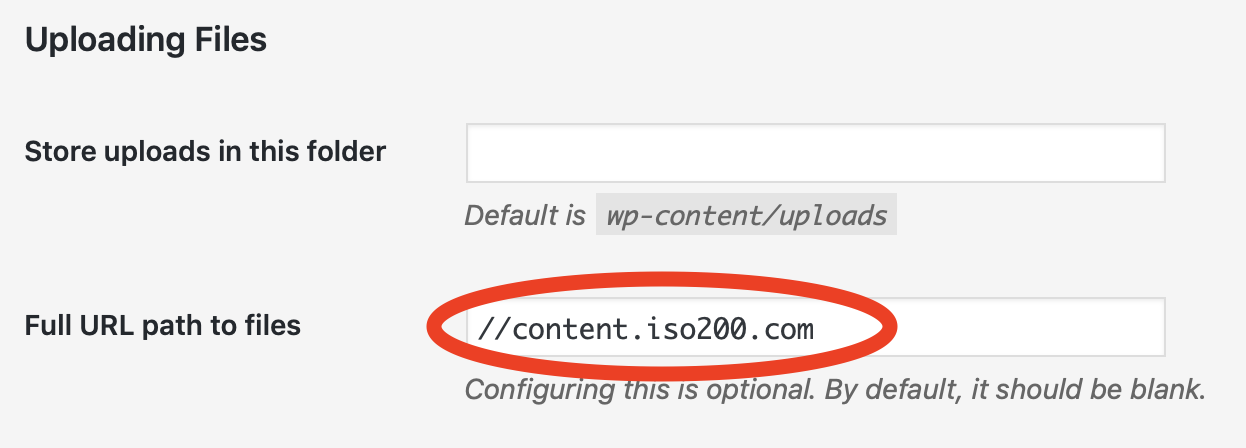
If you’re working with a complicated site then you may find that importing files and posts into WordPress is a bit of a black art – there are lots of places where things might go wrong. If the upload_url_path value for your site has been manually changed, then this might cause problems with WP export files.
Q: why would you change upload_url_path?
A: changing upload_url_path lets WordPress serve images etc. from a subdomain or different domain, which should improve site performance if you have an image-heavy site.
This is an example item entry from the WordPress eXtended RSS export file (this is a simplified entry, with most of the post data (comment status, stickiness, time, post ID etc. removed for clarity).
<item>
	<title><![CDATA[Triplets]]></title>
	<link>https://iso200.com/photo-blog/signs/neon-triplets/attachment/dsc_6318/</link>
	<pubDate>Fri, 15 May 2009 20:20:12 +0000</pubDate>
	<dc:creator><![CDATA[dlf]]></dc:creator>
	<guid isPermaLink="false">http://iso200.com/simple/wp-content/uploads/2009/05/dsc_63181.jpg</guid>
	<description></description>
	<content:encoded><![CDATA[neon, sign, Rue de la Paix, Paris, France]]></content:encoded>
	<excerpt:encoded><![CDATA[Rue de la Paix, Paris, France]]></excerpt:encoded>
	<wp:post_type><![CDATA[attachment]]></wp:post_type>
	<wp:attachment_url><![CDATA[//content.iso200.com/2009/05/dsc_63181.jpg]]></wp:attachment_url>
	<wp:postmeta>
	<wp:meta_key><![CDATA[_wp_attached_file]]></wp:meta_key>
	<wp:meta_value><![CDATA[2009/05/dsc_63181.jpg]]></wp:meta_value>
	</wp:postmeta>
</item>
The attachment url line doesn’t contain a protocol – either http or https – which is why my media import failed. A protocol isn’t needed when you change the upload_url_path value – but it is needed when WP is importing media.
Solutions:
1. Post-export: grep the file – add a transport protocol to the url – i.e. http: or https: Don’t forget to add the : after the protocol – the wp:attachment_url line should now look like this:
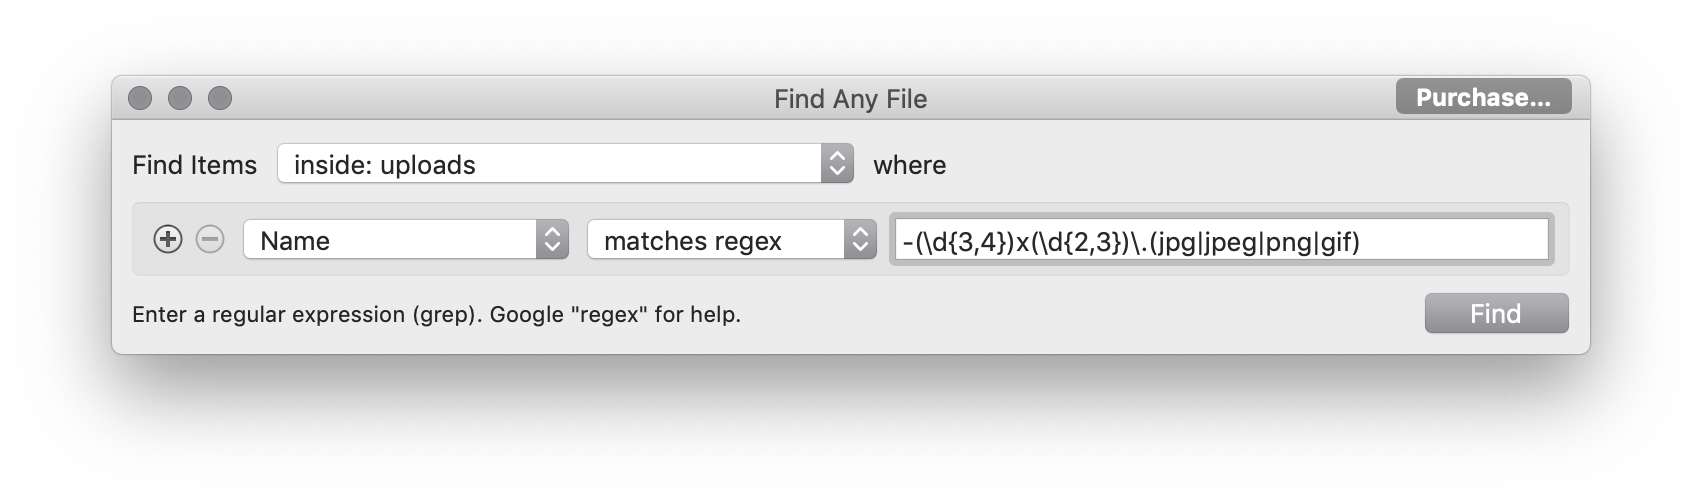
If you have folders full of intermediate thumbnail sizes that you don’t want, you can easily select and delete all the thumbnails WordPress has generated using the right tools. This is particularly useful if you change thumbnail sizes and want to get rid of old images.
If you have a Mac, use ‘Find Any File‘ and use a regex pattern to search for images: -(\d{2,4})x(\d{2,4})\.(jpg|jpeg|png|gif)
The regex will select file names that end with a dash followed by thumbnail width by thumnbmail height and the usual image file name extensions. This is the standard WP thumbnail naming format.
‘Find Any File’ will give you a window of images and you can manage/delete as you want.
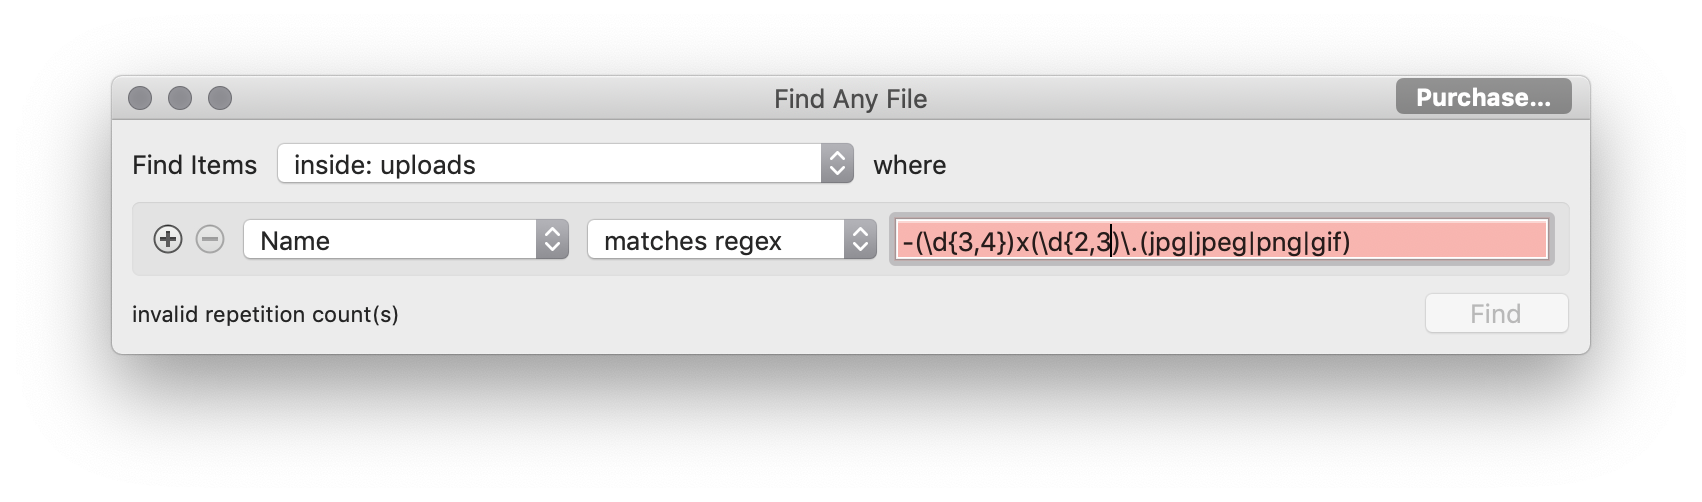
If you type an incorrect regex (search) string in, the app will helpfully flag the error:
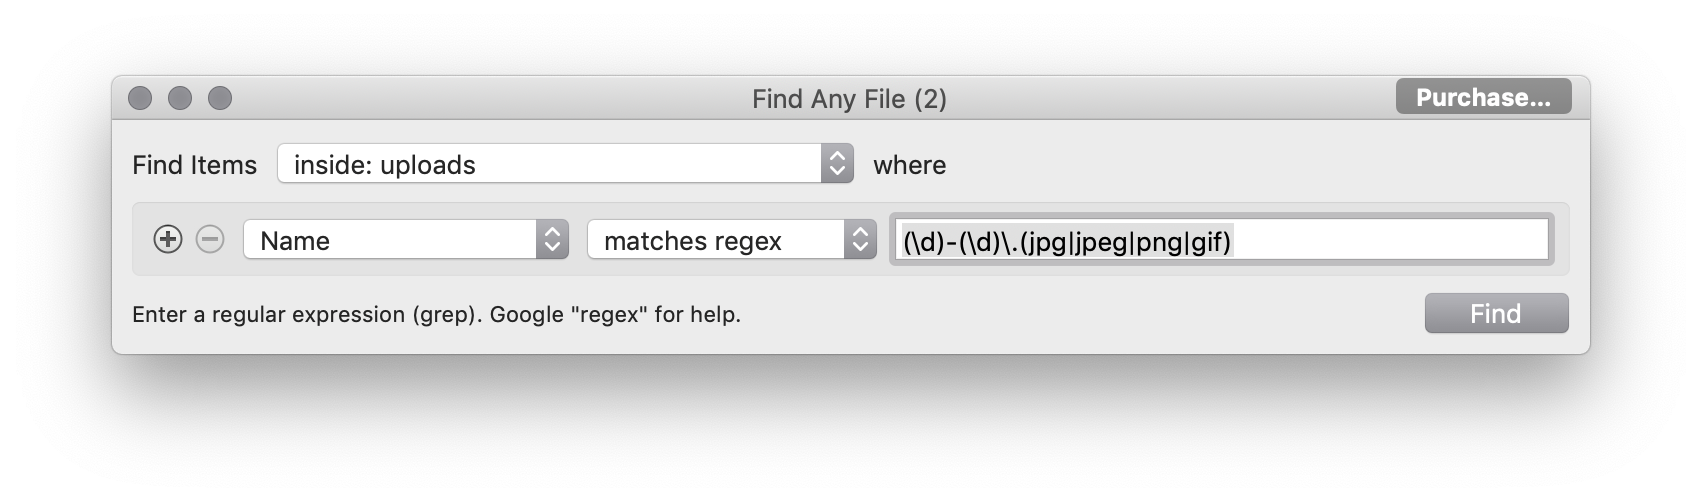
If you have repeatedly imported a test file into a development server, this may leave you with a number of additional duplicate full-size images in your uploads folder – the regex above will not remove these though.
This string has found a lot of duplicates for me – but not all – but be aware that it may select images that you don’t want, depending on their naming format: (\d)-(\d)\.(jpg|jpeg|png|gif)
TIP:
When you import a test file of WP posts (etc.) into a development server create a new Uploads folder each time you do a test import. This avoids the problem of having duplicate original files.
If you call get_the_excerpt() WordPress returns a string that looks like an excerpt – but it might not be. If your post doesn’t have a handcrafted excerpt, WordPress returns an automatically generated word-counted trimmed-down version of the full post content (see codex).
TL/DR: WordPress returns a string for get_the_excerpt() even when has_excerpt() is FALSE.
I’d used this bit of code to automatically add a ‘read more’ link at the end of every excerpt on a search page.
You have to do two things to add a new page template to WordPress.
1. Add a file with the correct name
WordPress uses a template hierarchy – you need to give your template the right name. Either page-ID.php – where ID is the post ID of the page you are targeting, or page-SLUG.php – where SLUG is either the slug of the page you are targeting or an understandable name you can assign through the page interface to pages.
2. Add a ‘Template Name’ declaration at the start of your template file
For WordPress to pick your template up, you need to start each page template file with a Template Name string followed by a unique name for the template:
If you use a static front page for your WordPress site, depending on its contents and structure it may show up in your search results – you may (or may not) want this to happen.
If you don’t want to see your front page in your search results, add this code to your functions.php file:
add_action( 'pre_get_posts', 'edinburgh_wp_exclude_front_page_from_search' );
function edinburgh_wp_exclude_front_page_from_search( $query ) {
    if ( $query->is_main_query() && $query->is_search() ) {
        // Get an array with page ID of front page
	$pageID = array(get_option('page_on_front'));
 	$query->set('post__not_in', $pageID);
    }
}
If you use a ‘regular’ setup and have a home page and not a static front page, use this slightly different function to exclude the home page from search results.
add_action( 'pre_get_posts', 'edinburgh_wp_exclude_home_page_from_search' );
function edinburgh_wp_exclude_home_page_from_search( $query ) {
    if ( $query->is_main_query() && $query->is_search() ) {
        // Get an array with page ID of home page
	$pageID = array(get_option('page_for_posts'));
 	$query->set('post__not_in', $pageID);
    }
}
You may not like how WordPress’ Categories widget lists categories – particularly if you want to modify the list that’s displayed and hide some categories or have a custom order of categories (rather than alphabetical or by number of posts).
So what’s the easiest way to customise the display of the Categories widget??
You don’t.
Create a new *menu*, add the categories that you want in the order you want them, and add your new menu to the widget area.